Initial Configuration Required for New Devices
New devices require the initial configurations explained below to provide the Ayla cloud with information to identify and authenticate the devices for the particular customer (OEM).
 Set the Device Serial Number (DSN) and Key
You should check to see if your device was already configured unless you are sure it is new. If the device was configured, there should be a DSNDevice Serial Number for it. To check on this, run the nvs-get CLI command. If a DSN is not found, you will not receive a message and instead get a new # prompt as shown below:
|
NOTE |
In the following command example, dev_id is the DSN. |
|
# nvs-get ada.f.id/dev_id # |
If a DSN is found, the message is similar to the following:
|
# nvs-get ada.f.id/dev_id ada.f.id/dev_id : AC000W001234567 |
To get a DSN, navigate to the Ayla Customer Dashboard for the service you are using, and follow these steps:
|
NOTE |
You have to be assigned the OEM Admin role in the dashboard to do this. Refer to Default User Roles in the Ayla Dashboard Help System. |
- Enter your email and password credentials in the Log In dialog box.
|
NOTE |
This is the email and password you specified when signing up for an Ayla Developer Account. |
- Click LOG IN to open the Ayla Customer Dashboard.
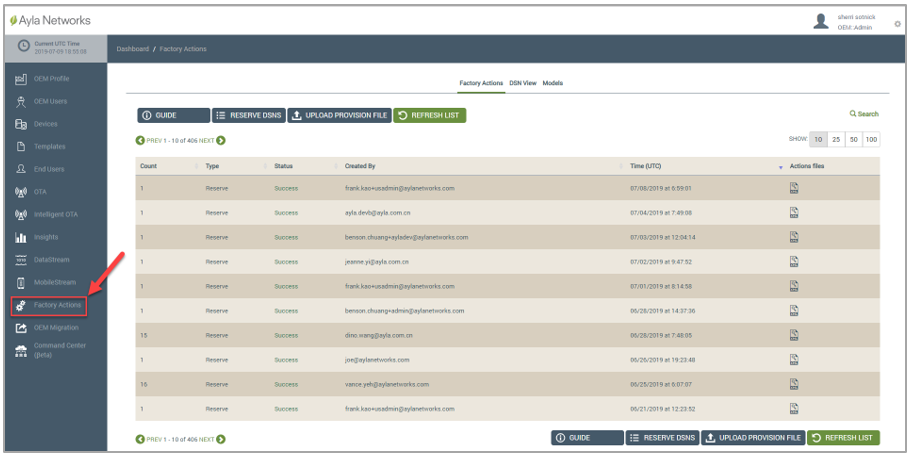
- In the navigation panel on the left, click Factory Actions, as shown below:
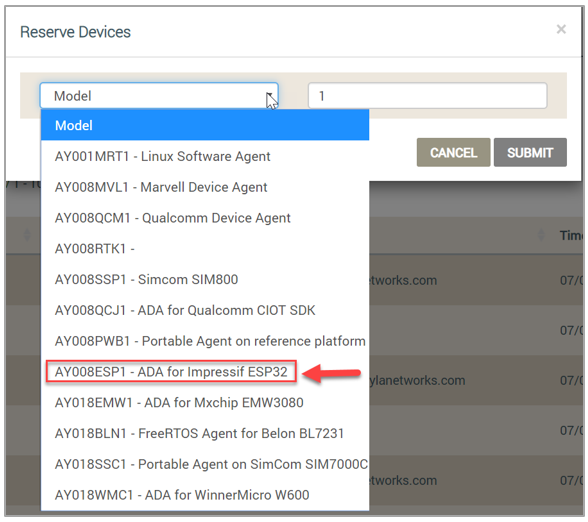
- Click RESERVE DSNS, and in the Reserve Devices dialog box, click the ESP32 model in the Model drop-down list, as shown below:
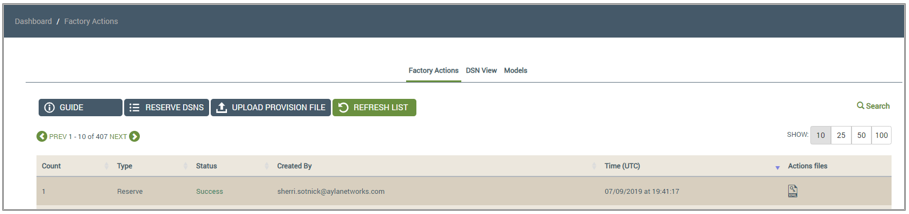
- Click SUBMIT. Notice that the job is added to the Factory Actions page, as shown below:
- Click the file under Actions files to download it. The file is a zipped XML file; an example of the contents is as follows:
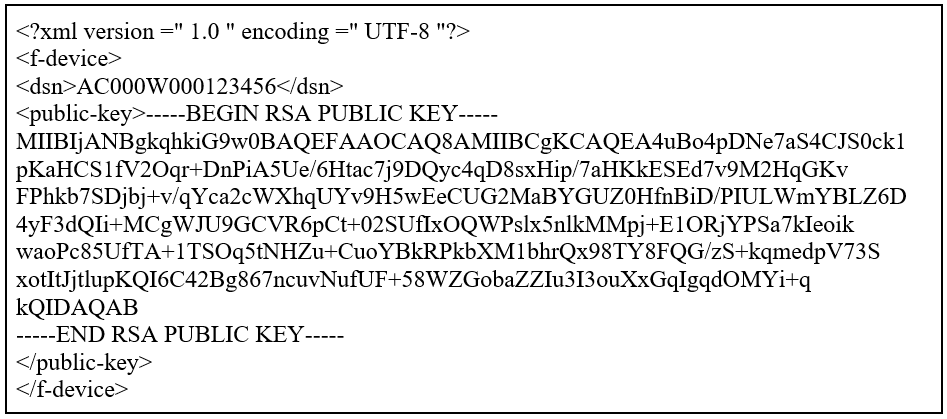
- Set the DSN and key as NVSNon-volatile storage for the Ayla Embedded Agent by collapsing the information in the XML file into a single line. Use the information between the dashed lines in the XML file, and eliminate blank spaces. The resulting command should look like the following example (note that the prompts and most of the key are omitted):

Set the OEM ID, Model, and Template Version
- Set the Ayla cloud device OEM ID and model in the examples/ayla_demo/main/conf.h file for DEMO_OEM_ID and DEMO_LEDEVB_MODEL using the values configured for your OEM.
- Create a template, and give that template a version string. Remember to set DEMO_TEMPLATE_VERSION to the template version.
- Use a mobile app (such as Ayla Aura) to complete the Wi-Fi setup and registration. For the best results, choose the AP-Mode registration method.
- Rebuild the demo to make sure all of the above updates when setting the OEM ID, model, and template version are incorporated.
Set the OEM Secret
To authenticate the device for your OEM, you must enter an OEM secret. This secret (key) is saved in encrypted form on the device and must be entered for each device after entering the public key. You can obtain the OEM secret from the Ayla Customer Dashboard, as follows:
|
NOTE |
You have to be assigned the OEM Admin role in the dashboard to do this. Refer to Default User Roles in the Ayla Dashboard Help System. |
- Enter your email and password credentials in the Log In dialog box.
|
NOTE |
This is the email and password you specified when signing up for an Ayla Developer Account. Refer to Create an Ayla Developer Account in Ayla Dashboard Help. |
- Click LOG IN to open the Ayla Customer Dashboard.
- In the navigation panel on the left, click OEM Profile, as shown below:
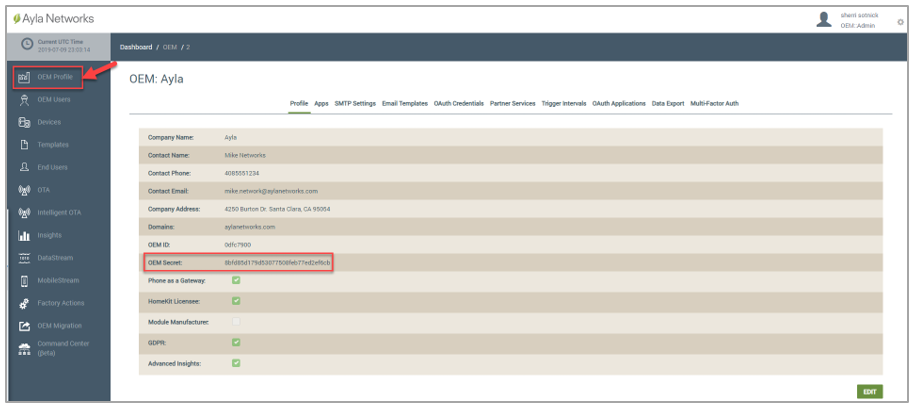
After obtaining the OEM key, set the key in the device as shown in the following command example.
|
NOTE |
In this example, the prompts and most of the key are omitted. |
|
oem key ab...cd save esp-reboot |
|
NOTE |
Refer to Ayla Dashboard Help for more information on updating the OEM Profile. |
Please click here to let us know how we're doing. Thank you.